Hell-Oh~! This is Shion-S3esther! On this blog you can find my cosplays, dances, drawings, pictures, hobbies and thoughts xD Hell-Oh~! Yo soy Shion-S3esther! En este blog encontraréis mis cosplays, bailes, dibujos, fotos, aficiones y rayadas mías xD Hell-Oh~!Shion-S3estherです!このブログでは、私のコスプレ、踊ってみた、ドローイング、写真、趣味や思考を見つけることができます^^ よろしくお願いします!
Truco o
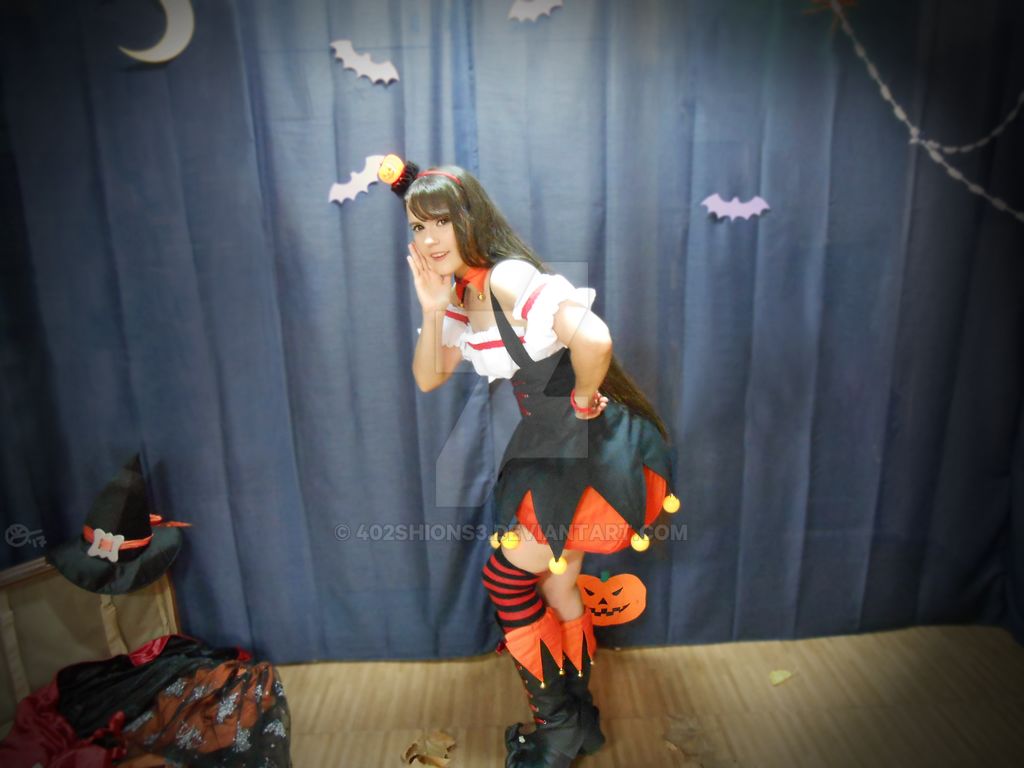
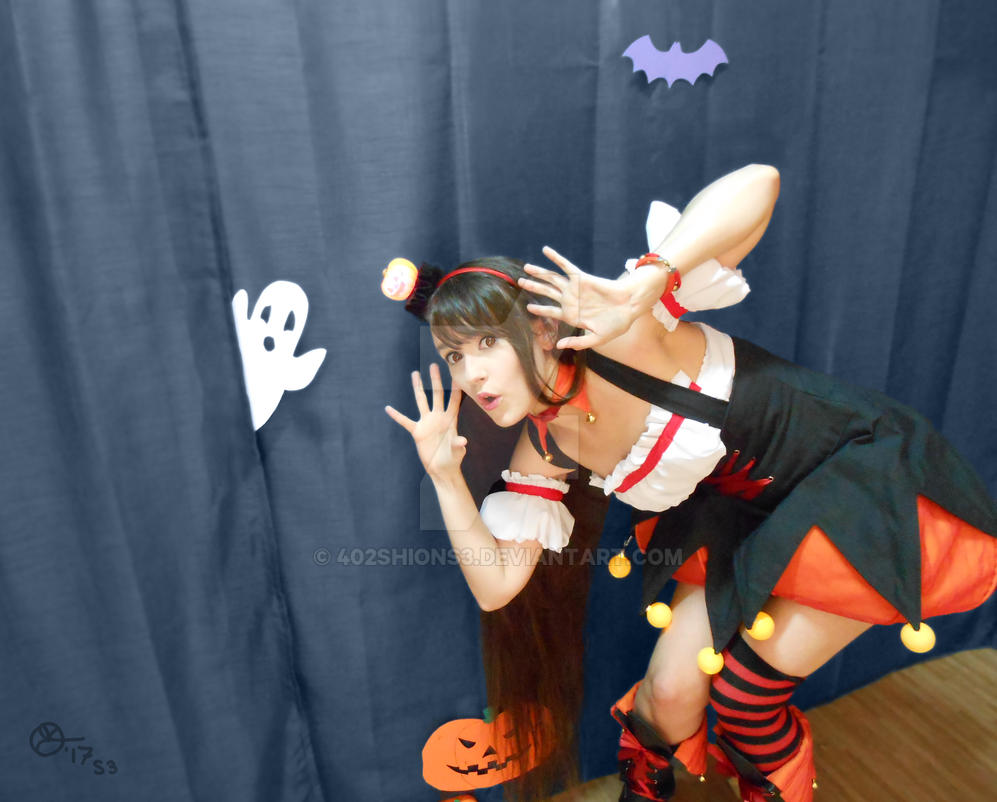
trato?! X_D En fin, eso, que este post es sobre un cosplay de Halloween. Es
el extend Halloween Trickster de Iori Minase (The iDOLM@STER)
Quería hacerlo desde hace bastante tiempo, pero todas las
veces me pasaba que estaba ocupada o se me echaba el tiempo encima y nada… Pero
este año me dije que tenía que ser, sí o sí, y bueno… lo he logrado xD Aunque
demasiado por los pelos :/ tanto, que no me ha dado tiempo a preparar un baile
para la fecha, pero es que desde que vino a casa mi gatita Midna, no se puede
ir a tanta velocidad xD
-Trick or
treat?!!!! X_D Ow, so... this is a post about Halloween cosplay. It is the
extend Halloween Trickster of Iori Minase (The iDOLM@STER)
I wanted to
do it since long ago, but every time I was busy or it was already too late to
finish it on time, but last year I promised myself that I was doing it next
time so I started gathering the stuff and, well… I did it! Just in time :_D So
just in time that I wasn’t able to prepare a dance I wanted to upload for this
day :/ Maybe a few days later I upload it. Since my cat is at home, things don’t
go as fast as usual :_D
Para este cosplay he usado: Tela negra (varios tipos),
amarilla, naranja, blanca (2 tipos) y roja, zapatos, un calcetín a rayas rojas
y negras, 10 bolas de navidad y un poco de pintura, una diadema, una calabaza,
pelo o peluca castaña, ojos o lentillas marrones y varios accesorios
(cremallera, velcro, botones, hilos, cascabeles, ojales, 4 bolitas, leds,
cable, etc).
-For this
cosplay I used: Fabric (black –various tipes-, yellow, orange, white (2) and
red), shoes, 1 high sock with red&black strips, 10 christmas balls and a
little paint, a diadem, a tiny pumpkin, brown hair or wig, brown eyes or
contact lenses and some accessories (zipper, velcro, buttons, threads, bells,
eyelets, 4 tiny balls, leds, wire, etc).
DIADEMA- Voy a empezar por la diadema, por elegir algún
orden xD iré de cabeza a pies xD
Compré una diadema roja para no marearme forrando una de
rojo~ No encontraba calabacitas lo suficientemente pequeñas, eran todas del
tamaño de la palma de la mano, cosa que es enorme para ponerlo en la diadema D:
en fin, acabé usando una de esas que son diademas con 2 calabacitas como
antena. Ya venía con pilas, led e interruptor, así que lo único que hice fue
desmontar el trasto, cortar cables, destruir una de las calabazas hasta
aprender qué presión debía ejercer ante ese material tan débil para hacer la
otra bien, montar de nuevo los cables con la inestimable ayuda de Breakman, y
poner todo en la diadema. Lo negro es fieltro dobladito. Tuve que poner un poco
de rejilla negra para disimular las pilas y el interruptor del led de la
calabaza, que asoman por debajo. Ah, y también pinté un poco la calabaza, que era solo naranja.
DIADEM- I’m
starting the house from the rooftop, just because.
I bought a
red diadem so I wouldn’t have to cover it. I had a hard time finding a pumpkin
of that size, all were at least like a hand. I ended up picking one of those
diadems with 2 tiny pumpkin-antennas. It already had wire, leds, switch, wire,
etc, so all I did was: DESTROY that diadem, cut wire everywhere and put together
the ones I needed (thanks to Breakman’s help!). I also destroyed one of the
pumpkins as I learned how to deal with that weak material, and then did the
good deal. Then I put it all in the red diadem, with ruffled black felt. I also
put some black net kind of fabric to hide the switch and batteries that show
down of the felt. Ah, I also painted the pumpkin a little.
COLLAR- Es como un cuello de camisa normal y corriente, con
la banda que rodea el cuello en tela roja, y los picos en naranja. Hice el
cierre por delante con un botón, para no complicarme la vida. No hubo una tela
naranja que me convenciese, así que acabé mezclando una tela amarilla de base
con una gasa naranja oscura algo transparente, que al mezclarse daban un tono
que me gustaba más. Le puse dos cascabeles dorados y bueno, no hay más :_D
CHOKER-
It’s like a regular shirt collar. The collar in red fabric and the rest in
orange. I didn’t find an orange fabric of my taste, so I mixed yellow and
orange fabrics together. The orange one was dark, but it was a bit see-through
so it came out a good orange. Then I put 2 golden bells, and that’s all.
TOP- Es una especie de blusa con muchos frunces, así que
hice con forro blanco una base ajustada y con gasa blanca hice la parte
superior. Por detrás no se veía más apertura que un botoncito blanco, pero yo
no tenía ganas de hacer esta pieza elástica, así que hice la pieza del botón,
pero también un cierre con velcro. Le puse les rojo y ya está.
TOP- It’s a
kind of blouse all gathered, so I made a fit piece with lining and then the
outside piece. I put velcro in the back. It was supposed to only have a button,
but I didn’t feel like making this piece elastic, so… Finally, I put red
bias and that’s all.
MANGAS- Estas piezas están hechas exactamente igual que el
top. Solo que cerrado del todo y con un elástico.
SLEEVES- These
pieces were made just like the top, but completely closed + elastic.
PULSERA- Son 2 cadenas, una de bies rojo y la otra de cinta
amarilla con la gasa naranja por encima, con 4 bolitas doradas (que eran blancas
y las pinté), y un cierre para este tipo de accesorios.
BRACELET- It
consists in 2 chains, one out of red bias and the other one yellow ribbon +
orange see-through fabric. With 4 golden tiny balls (actually white but I
painted them). And closed with a clasp.
VESTIDO- (Si se le puede llamar de esa manera) Son 2 capas
de tela negra cada pieza. El corpiño, cerrado con una cremallera, unos ojales
para pasar la cinta roja, unos tirantes y la parte de la falda, que tiene por
dentro unos canales para los cables. Porque, sí, las bolitas esas tienen dentro
leds. Yo no tengo soldador, así que Breakman me echó un cable con el tema
cables *ya paro con la coña xD* Y eso, que pinté las bolas de amarillo.
DRESS- (If
you can call it that way) I made each part with 2 layers of fabric. I put the
corset a zipper and some eyelets for the red ribbon. And I made a ribbon
channel for the wire. Because the Christmas balls have leds inside. It needed
to be shiny, ok? xD So, I don’t own a soldering iron, so I had Breakman’s help
with this. And I painted yellow the balls.
PANTALÓN- Como el cuello de la camisa, la parte naranja es
una mezcla de telas amarilla y naranja semitransparente. Hice un pantalón
interno y luego el externo con la forma que toca, como hice con el top y los
manguitos. Puse unas varillas en los canales que hay entre cada pieza de patrón
para que se quedase con forma redondita. LA tela negra para los bordes. Le puse
una cremallera y un botón. Y…
ya.
SHORTS- Again,
I made the yellow and orange fabric mix. I made some inner shorts and then the
pumpkin-like one for the outside. I put some rod pieces in the channels
between pattern pieces to make it round-shaped. Black fabric for the
corners. And I put a zipper and a button. That’s all.
CALCETÍN- Comprado
sin más.
HIGH SOCKS-
I bought it.
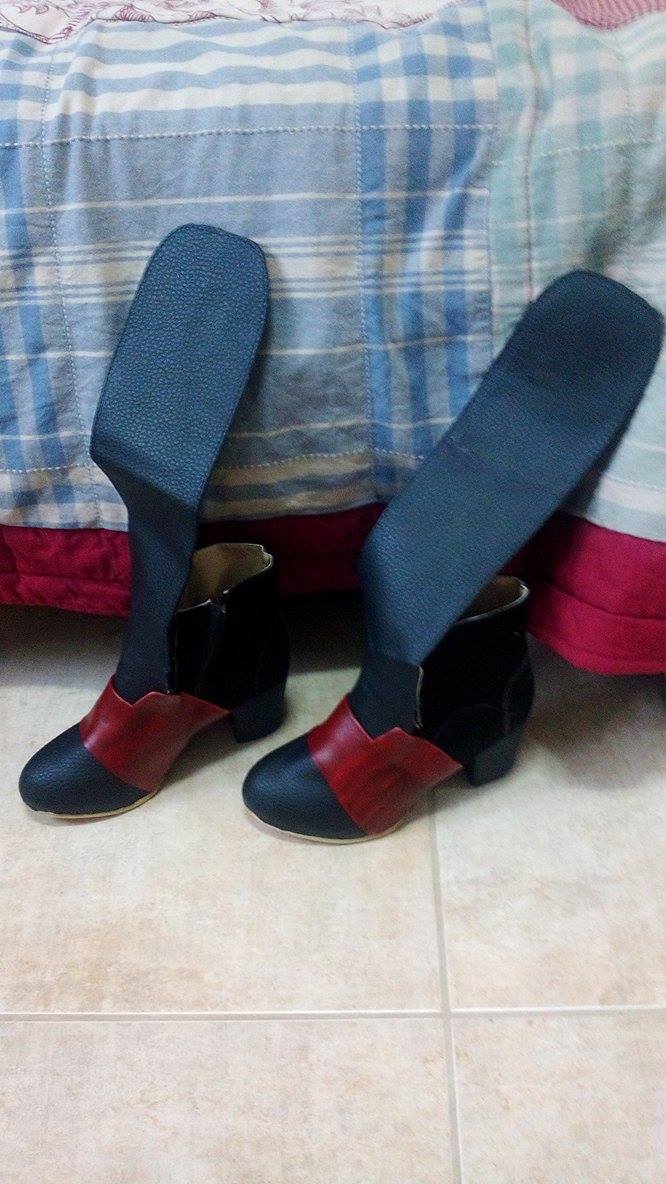
BOTAS- He usado unos zapatos escolares que compré para el
cosplay de love live, como base para el forro de las botas. Me dio un poco de
rabia porque la bota es casi idéntica a las botas que hice para ranko, pero no
podía reutilizarlas para este cosplay, no era factible… Así que hice la caña de
la bota de quita y pon, por si acaso vuelvo a necesitar este tipo de bota para
otro cosplay, ahorrar un poco de tiempo y tela xD. Lo que es la caña la hice
prácticamente igual que las de Ranko, y por otro lado la pieza naranja con los
cascabeles, y la pieza del zapato.
BOOTS- I
made the boots cover for some school-kind of shoes that I bought for the
lovelive cosplay. The boots are so similar to other boots I made (Ranko’s ones)
that I was sorry not being able to use part of the ones I already made, so this
time, I made it in pieces so next time I need this kind of boots, I can save
some fabric and time. There’s the shoe part, the leg part and the orange with
bells part.
LENTILLAS- Por lo general, cuando el personaje tiene los
ojos castaños, no uso lentillas, pero voy a probar a ver si con lentillas los
ojos no se me hacen negros en las fotos :/
LENSES- I
don’t usually wear contact lenses when the characters have my colour, but, I’m
trying some, just to see if my eyes don’t turn black in the pictures :/
Y bueno, aquí tenéis dos bailes! Uno es de idolmaster, el otro no, pero es más de Halloween que cualquiera de idolmaster x_D. Añadiré fotos cuando pueda ir arreglándolas ^^
Gracias por leer, espero que os haya gustado! Si tenéis
alguna duda podéis preguntarme e intentaré contestaros lo más claramente
posible que este medio me permite :__D
Feliz Halloween y hasta
otraaa!!!
So, here you have a dance! One is idolmaster's and the other one isn't, but it looks more like Halloween than any imas song x_D. Also, I’ll share here some pics when
I edit them ^^
Thanks for
reading, I hope you liked it. If you have any question, comment below and
I’ll try to do my best :_D
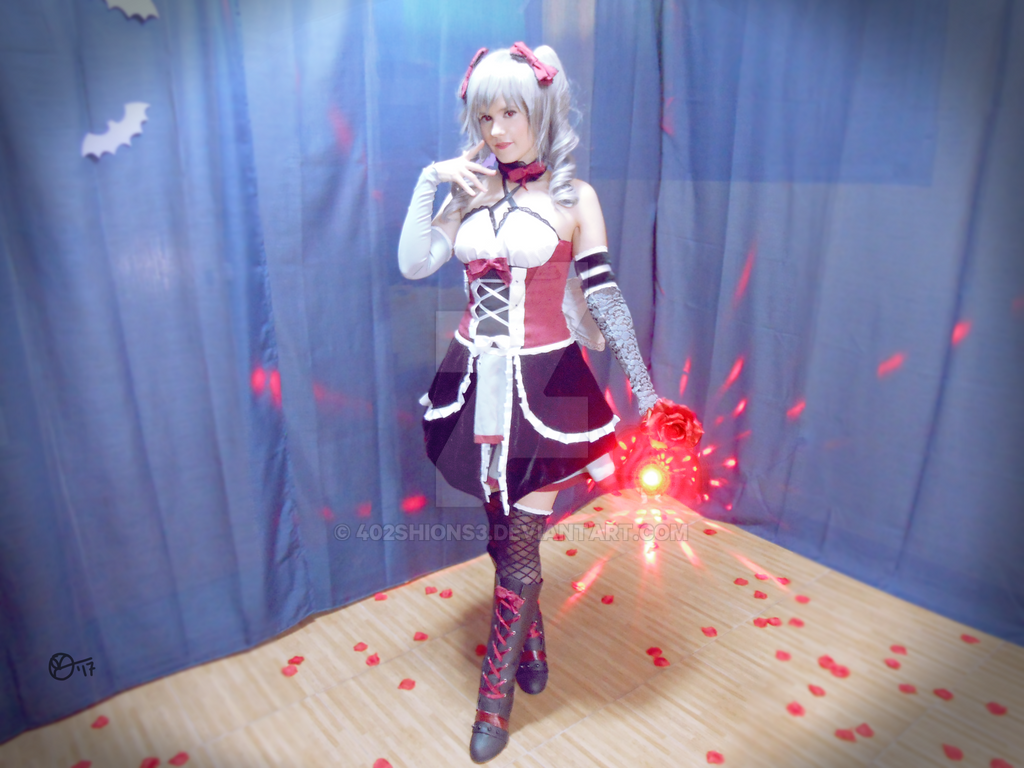
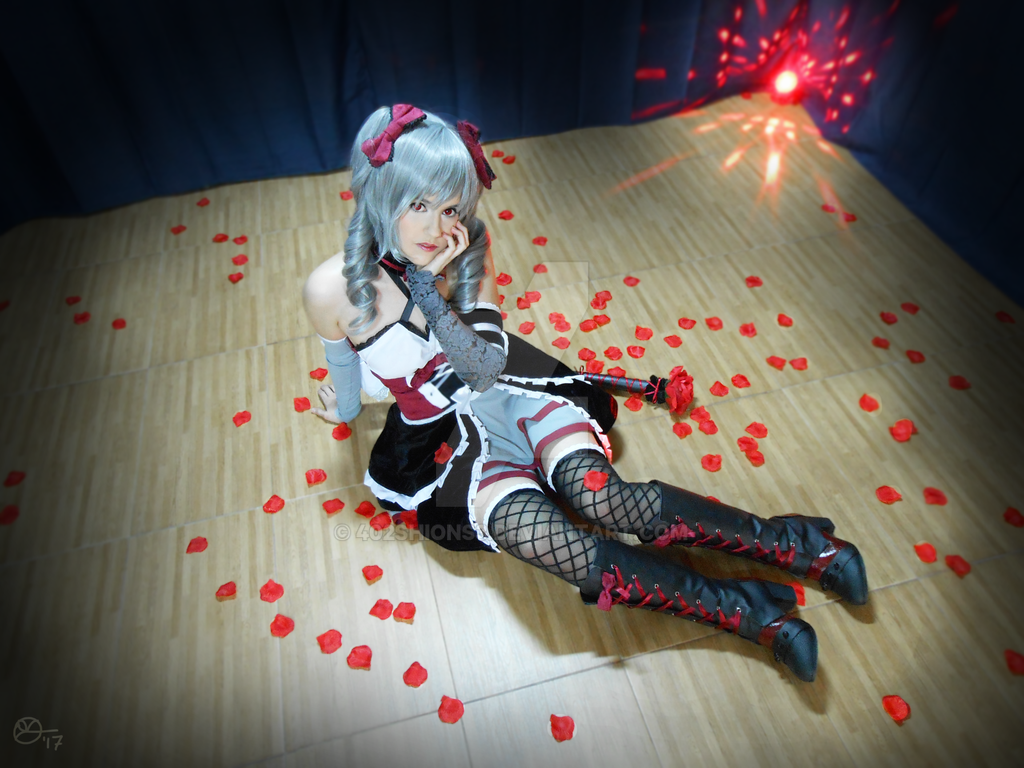
¡Hola! Como habéis visto en el título del post, hoy voy a
hablaros de un cosplay: Kanzaki Ranko (The iDOLM@STER Cinderella Girls)
No es Iori, pero no me he ido muy lejos… xD Es que vi su
video de la canción Hana Tsubomi Yumemiru Rapsodia ~Alma no Michibiki~ y me
encantó ella, su ropa, la canción, todo *-* ♥ aish ♥ (Algunos
recordaréis que compré su figma e hice un pequeño review aquí, hace muuucho) En
realidad empecé este cosplay en mayo de 2014 y lo tenía prácticamente terminado
en verano, pero a causa del trabajo no pude continuarlo ni nada :/ Y algunas
cosas van lentas, pero ya os lo explicaré poco a poco.
-Hi! As you
can see in the title, today, I’m talking about cosplay: Kanzaki Ranko (The
iDOLM@STER Cinderella Girls)
She isn’t
Iori, but it’s im@s anyway xD I watched her Hana Tsubomi Yumemiru Rapsodia ~Alma no Michibiki~videoclip and I just loved her, her
outfit, her song, everything!!! ♥ *-* (Some of you maybe remember that I
made a little review of her figma I own, looong ago) In fact, I started the
cosplay in 2014 (May) and it was almost finished by summer, but I started
working and it got paused :/ Some things are also going slow, but I’ll explain
later.
Para este cosplay he usado: tela roja, negra, blanca, gris,
polipiel y forro, unas medias con rejilla, botas para forrar, kilómetros de
diversas cintas y puntillas blancas, rojas y negras, un palo de madera, una
rosa de plástico, accesorios varios (botones, cremalleras, velcro, cierres,
ojetes, imperdible), un poco de goma eva, lentillas rojas y peluca gris con
coletas rizadas.
-For this
cosplay I used: red, black, white, grey, leatherette and lining fabrics, some
net stockings, boots to cover, km of various red, white and black laces and
ribbons, a wooden stick, a plastic rose, some accessories (buttons, zipper,
velcro, eyelets, safety pin, etc), a bit of foamie, red contact lenses and a
grey wig with 2 curled ponytails.
VESTIDO- Aproveché retales del brocado rojo del cosplay
Minase Iori - My Dear Vampire y también del forro. Me emocioné mucho cuando vi
que tenía suficiente ^^ También tenía retales para la pieza blanca del pecho y
la pieza negra del centro. Le cosí unas cintas de plástico a modo de varillas
de corset, para que se quedase con buena forma pero sin quedar exagerado. A la
parte del pecho le cosí un sujetador color carne que se le habían roto los
tirantes porque eran de plástico, y pues nada, reciclo xD Fue un poco
complicado calcular la forma del pecho para que no se chocase con el collar
pero fuera decoroso XDDD (omg, es esto un cofcof?) La puntilla negra del pecho
es muy bonita, pero tiende a doblarse y no se ve bien T_T Y la cinta negra que
se cruza por el pecho es IMPOSIBLE que se cruce así, según las leyes de la
naturaleza. Pero bueno. xD En el cuello le puse una pieza para ajustar la
tirantez de esas cintas ^^
Para la falda hice una falda de círculo en 2 capas de una
tela así como raso, pero por la cara interna, que queda como un aspecto
polvoriento que queda muy bien con el terciopelo y el brocado. Las piezas
negras de los lados de la falda los hice de terciopelo negro. La puntilla la
hice de una tela fina como de gasa. En la cintura puse una puntilla hecha de
bolillo, me pareció que le daba el toque antiguo que este cosplay necesita.
El lazo blanco lo hice de cinta, el rojo con tela. A las
piezas blancas del centro, les hice unos agujeros y les coloqué unos ojetes, y
por ahí pasé una cinta blanca muy finita. Cerré el vestido con una cremallera
por la parte trasera, porque era el único lugar poco visible y sin piezas
negras de la falda en medio. Para no estropear el efecto de la falda, la
cremallera sale desde la capa interna de la falda, y la superior se cierra con
un velcro.
Supongo que debería haber usado un petti, pero me da la
impresión que con todo el volumen de las telas queda suficientemente pomposo
sin quedar exagerado.
He utilizado diferentes tipos de puntilla, porque la de la
falda tenía que ser más grande para ser visible, pero la tela que utilizo para
eso, al doblarla para hacer los pliegues, hace mucho volumen, y eso habría
hecho grueso las medias y las mangas, pero la puntilla fina que usé en estas
piezas era demasiado pequeña para la falda, así que usé diferentes tipos ^^
DRESS- I
had leftovers of the red brocade fabric that I used for the cosplay Iori Minase– My Dear Vampire, and also leftovers of the black and white fabrics, so…
lucky!! :3
The body is
like a formal dress-corset so I made it in many pieces, with lining and also
used some pieces of plastic as like corset rods, so it keeps good shape but
isn’t too much stiff. I used some eyelets for the white pieces of the center,
and I put there a thin white ribbon. The white bow is of ribbon and the red bow
is of fabric.
The chest
pieces were difficult because I wanted to stay safe but I couldn’t let them
meet with the choker. I sewn there a beige bra I had with the suspenders broken
(recycle~recycle). I put there a lovely black lace (which is elastic so it
sometimes folds, and that’s annoying) and black lace crossing by the chest. I
put a piece to control the tightness of the black ribbon.
The skirt
is a circle skirt type, with 2 layers. It’s from a fabric like satin, but the
back of it xD It looks beautifully dusty, looks so good with the rest of the
fabrics I chose :3 I put some bias in the edges. The black pieces are from
velvet. The white laces are a light fabriclike chiffon. The lace from the waist is made of roll/bread roll (?), I
thought it would do fine with the vintage look.
I closed
the dress with a zipper, in the back.
I might
have used a petti, but I think all the fabric gives enough volume so it doesn’t
look overinflated.
I used
different kinds of lace for the sleeves/tights, waist and black parts of the
skirt, because the ones from the skirt looked better if they were huge, and the
ones from the sleeves/tights needed to be thinner. The fabric I used for the
skirt’s lace makes a lot of volume when I make the pleats, and I didn’t wanted
those pieces to look big :/ Also, I couldn’t use that lace for the skirt and
the waist, because it is so tiny and it wouldn’t be noticeable…
MANGAS- Para la manga del brazo derecho utilicé la misma
tela gris de la falda. Es ligeramente elástica, así que es muy cómoda :) El
borde lo cosí con forma de pétalos ^^ Y le puse una puntilla en el otro borde.
Esto me ha supuesto un poco de pérdida de la elasticidad y creo que lo arreglaré
próximamente :/
La manga del brazo derecho la hice con una tela negra de
rejilla con flores grises aterciopeladas *-* ¡Fue una suerte encontrar esta
tela! Estaba volviéndome loca buscando unas medias con estampado de rosas que
no fueran feas D: y de repente encontre esta tela, que además es algo elástica,
cosa que me viene de maravilla *-* También le cosí el borde con forma de
pétalos ^^ En el otro borde le puse una pieza de terciopelo negro, que también
es algo elástico, pero se ha perdido algo de elasticidad con las puntillas
blancas (como las del otro brazo) y la cinta blanca (sobretodo esta última,
cosa que no entiendo, porque lo medí mil veces) y esto lo tengo que arreglar
porque se me hace algo difícil para ponérmelo :/
SLEEVES-
For the right one I used the same grey fabric from the skirt. As it is a bit
elastic, it’s soooo comfortable :) I sewn the tip flower shaped ^^ And I put a
white lace. The lace wasn’t elastic, so the sleeve is stiffer now, and I want
to fix that :/
For the
left sleeve I used a black fishnet fabric with grey velvet flowers *-* I was SO
lucky to find that fabric!!! And it is also elastic, so hepful >w< I was
going crazy trying to find some stockings with rose pattern, but all I could
find where ugly roses, also only in black :S So I felt so lucky when I entered
the fabric store and I saw it *-* <3 I also made the flower shaped tip. I
put a piece of black velvet (which is also a little bit elastic <3 ) and
white lace and ribbon. The ribbon made it loose a lot of elasticity, now it’s
difficult to put the sleeve on, so I’m definitely fixing that!
MEDIAS- Tenía unas medias de rejilla que se me agujerearon
porque me caí al suelo (en medio de un paso de peatones, ni más ni menos… :_D )
Así que decidí reciclarlos, ya que la parte rota queda tapada por las botas de
ese cosplay ^^ De todos modos le cosí en el agujero con cuidado un pedazo de
tela negra de media para hacerlo más resistente. Corté las medias y, para
evitar que se rompieran, le hice un dobladillo y poco a poco a mano le cosí una
cinta negra, y a la cinta negra le cosí la misma puntilla que para las mangas
(aquí aprendí la lección de las tiranteces :__D)
TIGHTS- I
had some black fishnet tights that where broken because I fell to the floor (in
a crosswalk, no less :_D ), so I decided to used them for this cosplay, as long
as the broken part is hidden by the boots. Anyway I sewn a piece of fabric to
the broken part, to make it stronger. Well, so, I cut the tights, but I didn’t
wanted to break them while trying to wear them, so I folded 2-3 times the edge,
and I carefully sewn by hand that part to a black ribbon, and then I sewn the
white lace to that black ribbon (I learnt from the elasticity thing this time
x_D)
LAZO- Hice el lazo con tela blanca normal y una puntilla
translúcida muy bonita :3 Cuanto hice el lazo, pensé que tenía que ser más
rígido, así que le pegué un poco de goma eva, y quedó así de bonito :3 Para
engancharlo al vestido, le puse dos botones.
BOW- I made
it with regular white fabric and a cute semi-translucent lace :3 When I made it
I thought it should look stiff, so I glued some foamie in it, and it looks this
way ^^ I used two buttons to attach it to the dress.
COLLAR- Lo hice de terciopelo negro, le cosí puntilla negra
como la del pecho, y cinta carmín. Le puse un botón y le cosí el lacito ^^ Le
puse unas presillas para pasar por ahí la cinta negra que sube del vestido,
para que el collar no se me girase, pero es un poco difícil pasarlo por ahí,
así que no lo uso x_D
CHOKER- I
made it with black velvet. I sewn black lace and carmine ribbon to it, a button
and the bow. I put there something like belt loops for the black ribbon, so the
choker keeps in place, but it’s difficult to put the ribbon through it, so I
don’t use that x_D
LACITOS- Los lazos de la cabeza los hice con la misma tela
del vestido, y les puse una puntilla negra muy mona :3
LITTLE
BOWS- The ones for the head. I made them from the same fabric of the dress, and
I also used a lovely black lace :3
BOTAS- Para las fotos todavía no había hecho las botas, así
que utilicé unas similares que tengo. En este caso, como el diseño de la bota
es algo más complejo, pegué las piezas sobre el zapato, en vez de hacer un
forro. Pero no tenía ningún calzado similar que me diera igual perder, por eso,
compré unos botines que tenían la puntera de una forma similar y que el tacón
pareciese cómodo. Pinté parte de la suela, puse tela antideslizante en el tacón
(que era resbaloso hasta decir basta…), y forré el tacón y la puntera. No
encontré una polipiel roja oscura a buen precio, así que compré la roja normal
y le di una capa de pintura más oscura y barniz. La lengüeta y la caña de la
bota tienen un forro de fieltro. Le puse los ojetes y pasé los cordones.
Después, coloqué unos remaches en una tira de polipiel, los pinté de negro
(porque no había negros, solo plateados) y puse esta pieza en la bota. Forré la
parte visible de la suela y… terminé!! *-* Me encanta cómohan quedado *-* ♥ ♥ (Los lazos son
los del apartado de lacitos xD)
BOOTS- In
the pics, I hadn’t finished the boots yet, so I used some boots I have that
look similar. The design for this boots is a little complex, so I thought it
would be better to attach all the pieces on the boots rather than making a boot
cover. But, I didn’t have any boots that I could use for this, so I bought some
boots with similar shape. I painted part of the sole and glued some antiskid
fabric (for some reason, the material of the heels was pretty slippery). Then I
covered the heels and the tip of the boots. I couldn’t find at a good price the
red leatherette, so I painted it darker. I made the body of the boots with
black leatherette with felt lining. I put the eyelets and put the shoelace.
(The bows are the ones from the LITTLE BOWS section) Then, I put some rivets on a
piece of leatherette, painted them black (because there were only silver ones)
and put that piece onto the boot. And, to finish, I put a piece of black
leatherette covering the visible part of the sole, and that’s all. *-* I’m so
glad of how this came out!! ♥ I’m thinking of offering cosplay shoe and
boot commissions! Just ask ^^
VARA- Para
esto me ayudó Breakman. Compré una vara de madera y él talló la forma y la pintó
de negro. Yo le puse las cintas rojas, el dobladillo de terciopelo negro, los
lazos y la rosa. Para la pieza dorada de la punta he utilizado masilla. No sé si debe ser así o es la marca que utilicé, pero me ha parecido dura ;-; mis dedos lloraban al moldear eso. Y creo que debería haberlo hecho con un proceso distinto al que he llevado, pero bueno, así se queda xD Y para la gema, hice un prototipo con masilla y Breakman le hizo un molde. Tratamos de hacerla con resina + pigmento rojo que tenía yo, pero aparentemente esa resina amarillea y se vuelve gomosa con el pigmento (o al menos el que yo tenía). Hicimos dos intentos, y al final decidí que mejor hacerla transparente y pintarla con pintura roja de cristal. Tuve que repararle la punta, porque no había manera de que no quedase ahí una burbuja, aunque pintado no se nota tanto así que bueno x_D Y nada, la base la pinté dorada, la pegué a la vara, y la gema a la base. Y por fin. Creo que es lo que más me ha costado de hacer de todo este cosplay ._.
*No hay foto del molde porque era de una pieza, y no se ve realmente nada, más que un cubo blanco de silicona :/
WAND-
Breakman helped me with this. I bought a wooden stick and he carved the shape
and painted it. I put the red ribbons, the black velvet, the rose and the bows. I made the golden piece out of epoxy putty. A bit hard to work with, in my opinion >< And for the red gem,I made a prototype in putty, Breakman made a mold. We tried to mix red pigment to the resin, but it didn't work neatly, so I decided to have the gem made transparent and paint it with crystal paint. Then I painted the golden piece and attached it to the wand and the gem to it. AT LEAST. I think this is the piece that took me more time of this cosplay ._. Really. *There's no pic of the mold because it's a one--piece mold, so you can only see a white silicon cube :/
LENTILLAS- Compré las mismas que tuve anteriormente, porque
son bonitas y naturales, quedan bien con mis ojos oscuros, y resultaron ser
super cómodas (al contrario que las lentillas azules que tuve)
LENSES- I
bought the same model of red lenses I had once, because it looks good and
natural, it’s nice with dark eye colors, and it’s also really comfortable
(unlike the blue lenses I owned D: )
PELUCA- Cuando compré la peluca, Ranko todavía no era
conocida, porque no había ni siquiera salido el anime de Cinderella, así que
había solo dos tonos de gris en pelucas de dos coletas. Un gris clarito casi
blanco y un gris super oscuro que no me gustaba nada T_T Así que compré la gris
clarita cruzando los dedos porque resultase ser algo más oscura, o tal vez en
oscurecerla un poco yo después, pero era casi blanca, y en las fotos todavía
salía más blanca… Además, venía con un cardado en la parte frontal, para dar
más volumen a la cabeza, y eso hacía que el pelo se alejase de mi cara, por más
que lo aplastase, y no me gustaba nada como quedaba T_T De todos modos seguí
adelante y estilicé las coletas (porque como no eran para ranko, eran lisas) Y
aquí hay otro problema; si te fijas en la figma y en los dibujos, a Ranko el
pelo no le llega a los hombros apenas. Así que así corté las coletas y las
ricé. Más bien un ondulado que un tirabuzón, porque tengo una plancha, pero no
material para hacer tirabuzones. Y bueno, la peluca quedó monísima, pero no
parecía nada Ranko T_T entre que se separaba el pelo del flequillo, que era
demasiado claro y que en dibujo ese largo está bien, pero en persona queda
mejor si es más largo… Pues fatal T_T Así que me compré otra hace poquito,
ahora que Ranko ya es conocida si que estaba disponible su color, y las coletas
ya rizadas. Así que nada, estilicé el flequillo y las coletas paso de tocarlas.
Son más largas de lo que deberían, pero en persona quedan mejor así ><
!!!!!
***La otra peluca está en venta!! No conozco ningún
personaje para esta peluca, pero creo que quedaría muy bonita para vestir
Lolita o kimono ^^ (Por eso me da algo de pena, pero tengo ya otras pelucas que
podría usar para eso) Puedes mandarme un mensaje si te interesa la peluca ^^
WIG- When I
bought Ranko’s wig, she wasn’t known, because the anime hadn’t aired yet, so
her hair colour wasn’t available :S There was a super light grey, almost white,
and a super ugly dark grey. So I bought the light one hoping it was darker than
in the pic, but it wasn’t :_D And it looked even more whiter in the pictures D:
Also, the part of the fringe is combed. In theory, it’s meant to make the head
look bigger, but in the practice it makes a gap between the hair and my face,
and I don’t quite like that :/ Seriously. So, hum, anyway, I tried doing ahead
with it and I stylized the ponytails (because, as long that wig wasn’t meant
for Ranko, the ponytails were straight) And then we have another problem. You
see, in the figma and pictures, Ranko’s hair hardly reaches her shoulders, so,
that’s what I made. I cut the ponytails and I tried to curl them with the tools
I have, so it isn’t a curl, but many little curls. It’s not like Ranko’s, but
it’s still cute <3 Anyway! When a person is wearing that, that hair length
is weird, it looks better if it’s longer :/ So, even if the ponytail’s length
was accurate, it didn’t looked good. Well, it’s more like, even if the length
is accurate and it’s so cute, it doesn’t look like Ranko at all :S So, huh…
well, I bought a new wig, now that Ranko’s known. Now her hair colour is available,
and the ponytails are already curled, so I just stylized the fringe and I don’t
care if the ponytails are too long, because they look gorgeous! <3
***It’s
sad, because the other wig is sooo cute, but I don’t think I’m using it for any
other thing, so I’m selling it. It could work for Lolita, kimono or another
cosplay I just don’t know about. Just message me and we can talk about it ^^
Y bueno, nada más. Que ya añadiré fotos cuandovaya arreglando las poquitas que me he tomado, y aquí tenéis el vídeo ^^
Gracias por leer, espero que haya servido de ayuda y os haya
gustado! Si tenéis alguna duda podéis preguntarme en los comentarios abajo, e
intentaré contestaros lo más claramente posible que este medio me permite :__D
Hasta
otraaa!!!
And that’s
all. I’ll share here some pics when I edit the few ones I have, and here's the video ^^
Thanks for
reading, I hope this was helpful. If you have any question, just comment below
and I’ll try to do my best :_D