
Hell-Oh!!! Como dice el título, esta vez os traigo el cosplay de
Hakurei Reimu, de Touhou Project!
Hell-Oh!!! As you can see in the title, this time we're talking about
Touhou Project's Hakurei Reimu cosplay!
Bueno, a estas alturas no creo que haga falta que os explique que
Reimu es una de las protagonistas de los juegos de Touhou Project, ni
lo que es Touhou, pero... Bueno, lo único que diré es que aunque he
jugado, soy muy muy mala en esos juegos xD Ya sabéis que por muy
bien que me sepa los bailes siempre me pongo nerviosa y hago fallos
porque sí. Pues con estos juegos tan frenéticos es mil veces peor
xD Y no mejoro. xDDD
Well, at this time of the game *ba-dum-tsss* I don't think it's
neccessary to say that Reimu's one of Touhou Project's main
characters, neither what is Touhou, but... at least I'll say that: I
played the games, but I suck at it. Like terrible xD You already know
that, when dancing, I always get so nervous I got wrong the steps, no
matter how well I learnt it. So, with these intense games I'm even
worse. Like 1000 times worse. And I don't get better at it xDD

Bueno, pues este cosplay me lo pidió Tuxペンギン,
un usuario de twitter. En parte, me sorprendió. A ver, me explico.
Ya sabéis que tengo fijación por cierto tipo de personajes (y no me
refiero a personajes concretos que repita mucho, sino a colores de
pelo, carácter, tipo de ropa...), y los que no encajan en ese tipo,
pueden parecerme bonitos pero no doy el paso de decir "me lo
hago". Igual os habréis dado cuenta, pero tiendo a elegir
colores más oscuros (azules, rojos, negros, grises) o pasteles, pero
colores tan vibrantes (como los de Ranka) rara vez los elijo. Y es
que Reimu va de rojo chillón xD Es un color que casi nunca uso. Y
dije oye, pues por cambiar… Además, normalmente cuando me piden
cosplays, suelen ser personajes en bañador :( así que, por una vez
que me piden algo decente...
So, this cosplay was requested by Twitter user Tuxペンギン.
It surprised me a bit. I mean, you already know that I tend to
cosplay certain characters (and I'm not referring to repeating
character, but to hair colours, personality, clothing...), and the
ones that aren't like that, I may think they're cute, but
it doesn’t occur to me to think that I could cosplay them. I
tend to pick dark colours (blue, red, black, grey) or pastel. I
rarely pick bright colours (like Ranka Lee). Reimu's bright red xD
It's a colour I rarely use. So, when I got it requested, I thought:
Why not? Just for a change. And also... I think it's the first time I
get requested a cosplay that's not wearing only bikinis :( I got
requested something cute and decent for once...

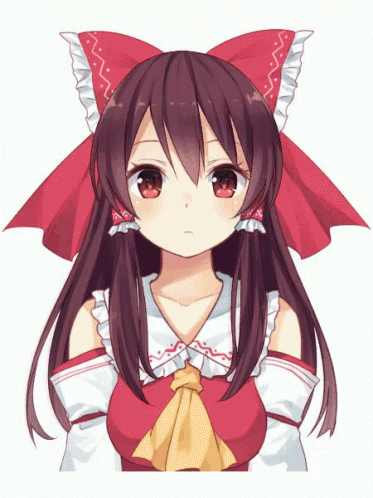
Lo que sí he de aclarar es que Reimu tiene un montón de versiones.
En todos los juegos tiene algún detalle diferente. En los primeros
juegos, de hecho, era bastante distinta. Así que elegí el diseño
que me pareció más limpio y práctico, con el pelo de la 1ª
versión ^^ Lo puntualizo ahora para no tener que entrar en detalle
en cada una de las piezas del cosplay.
The only thing I want to clear up about this costume is the version I
made, because Reimu has differences in all games. In fact, she was
very different in the first games. So, I picked the design that
looked more polished and clean, with the 1st Reimu's hair ^^ I say
this in advance, so I don't have to explain why I chose to make that
way the pieces of the costume.


Como he dicho ya en mis redes sociales, hace "poco" me
compré un maniquí. Y lo he estrenado con este cosplay. A mi me
dijeron que el maniquí no era tan bueno y que no sólo no hacia
falta sino que a veces era peor usarlo... Pero tras haberlo usado, la
verdad es que no entiendo el por qué de ese consejo. El maniquí no tiene exactamente mis
medidas, así que obviamente he tenido que medirme a mi, y hacer los
ajustes sobre mí, para asegurarme de que me viene bien. Pero una vez
tomadas las medidas, se puede ajustar bordes, comprobar piezas, cosas
que han de quedar simétricas, de una forma mucho más sencilla,
rápida y precisa que sobre uno mismo... Por no hablar de que reduces
el probarte el cosplay a (por ej) unas 2 de las 10 veces que
necesitabas anteriormente. Creo que el maniquí me ha ayudado
muchísimo a ajustar mejor el largo de las piezas, a encajar el
cuello (es del que más orgullosa estoy hasta la fecha) y todo ha
quedado mucho más limpio y con mejor forma. El maniquí no soluciona
que tengas que probártelo y ajustarlo para tí, pero es una
herramienta super super útil. Si tenéis el dinero para ello, es una
muy buena inversión. En mi caso, encontré uno a muy buen precio en
el Tedi. Pero si en algún futuro si se me rompe o algo así, me
compraré uno bueno sin dudarlo.
I already talked about it on my social media, but, anyway: Lately, I
bought a mannequin. This is the first costume I sew using the
mannequin. I was told that mannequins weren't good and that not only
were them unneccessary, but that they even made things look worse…
But, after using it, I really don't understand why I was told that advice or why did that person think that. The mannequin
doesn't have my exact sizing, so obviously I measured myself, to be
sure the cosplay fitted. I also needed to try the pieces on me sometimes,
it's not a magical tool, but, for instance, I had to try it on like 2
times of the 10 I would've needed to, without the mannequin. It's a
super useful tool, a game changing. Once you have the size, and
adjustments on you, you can check shapes, edges, symmetry, and so on,
on the mannequin, much more easier than on your own body, or laying
the costume on a surface. It was super useful for checking the lenght
of the pieces, fitting the neck (seriously, this is the neck I'm more
proud above all I've done until now) and everything looks cleaner and
better shaped. Really, super recommended. If you have the money, it's
a good investment. I bought mine so unexpensive at Tedi's, but if it
breaks in the future, I'll buy one of good quality without a doubt.


Bueno, en fin, al lío, que me enredo a hablar, y debería estar
mostrándoos el proceso y esas cosas xD.
Paso de hacer el disclaimer de que podéis usar los materiales que os
salgan de la nariz y hacer la versión que os de la gana, que a estas
alturas ya, quien se ofende y comenta estupideces es que necesita
hacérselo mirar.
Yo he utilizado: mi pelo, tela (roja, blanca, amarilla, 2 tipos de
entretela, fieltro), cintas y puntillas de diferentes tipos (rojas y
blancas), calcetines blancos, zapatos negros, un palo de madera fino,
accesorios varios (cremallera, gomas, diadema, ganchos, coletas,
abalorios, etc), pololos y petti.
Anyway, let's get to it. I should be talking about the proccess
already xD
I really don't want to do a disclaimer. I think that, at this point,
EVERYONE should understand as default that you can use the materials
you want and the version you prefer, and if anyone gets offended,
that person needs some help.
I used: my hair, fabric (red, yellow, white, 2 kinds of interlining,
felt), ribbons and lace of different kinds (red and white), white
socks, black shoes, a thin wooden stick, various accessories (zipper,
rubber band, diadem, hair clip, beads, etc), bloomers and petti.


ACCESORIOS PELO
Vamos a empezar por la cabeza, por seguir alguna especie de orden(?)
Están el lazo y los accesorios de los mechones. La tela roja es la
misma que para el vestido, la puntilla blanca es la misma que la del
cuello del vestido y la cinta fina blanca es del mismo tipo y tamaño
que la roja del cuello.
Para el lazo, primero cosí la cinta en zigzag, le puse la puntilla y
cosí la forma del lazo, tanto del cuerpo como las cintas colgantes.
Luego al cuerpo del lazo le planché por dentro entretela de pegar
gruesa, para que el lazo se mantuviera con forma. Se puede hacer con
goma eva, pero para esto casi prefiero la entretela. Después, monté
las piezas sobre una diadema, les puse los abalorios blancos en el
zigzag y voliá lazo enorme.
Para los accesorios de los mechones, cosí 2 tubitos con puntilla, y
luego les cosí con dos tipos de abalorios, unos en forma de tubo y
el otro de bolita, el zigzag.
Y, ahora, el chanchullo curioso de cómo me lo pongo en la cabeza
todo para que no se vaya de paseo (os dejaré al final del post
también el vídeo del cosplay closet, cuando lo suba, que ahí lo
muestro mejor).
1- separo los 2 mechones y con un par de gomitas elásticas de esas
muy pequeñitas que no se resbalan, delimito por dónde irá el
accesorio, porque dentro del accesorio pegué unos ganchos del pelo,
y paso el gancho por dentro de la goma. Debería mantenerse en el
sitio, pero si saltas mucho puede llegar a caerse; pero tiene fácil
solución temporal, enganchando el gancho directamente al tubo(?)
2- separo una sección de pelo de la zona superior de la cabeza, y le
pongo una coleta pequeña del color de mi pelo. Debe quedar bien
tenso para que sujete bien todo.
3- paso una coleta roja de un lado a otro del pelo de la sección
recogida en la coleta del punto anterior. Paso las puntas de la
diadema a través de los 2 extremos de la coleta. Lo ajusto bien tras
las orejas y engancho los 2 lados de la diadema con 2 ganchos
fuertes. Si la zona colgante del lazo se mueve mucho, se puede
enganchar un poco con estos ganchos.
4- Junto el resto del pelo y anudo cerca del final del pelo, y luego
le pongo un lazo con una cinta como la roja de las mangas.
*Truco: Para pasar los mechones por los tubos de tela y la coleta
roja por la zona de pelo, utilizo un accesorio de pelo que muestro en
la foto. Es muy útil, sin eso, hubiera tenido que hacer los tubos
con velcro y se hubiera estado enredando en mi pelo...
HAIR ACCESSORIES
Let's start by the head, just to follow some kind of order(?) There's
the ribbon and the lock accessories. The red fabric is the same from
the dress, the white lace and the thin white ribbon are the same from
the neck's.
For the ribbon, I first sewed the thin zigzag, added the lace, and
then sewed the ribbon shape. I ironed a piece of thick interlining
inside the body of the ribbon, for the shape. It's easy doing it with
foamie, too, but I preferred doing it this way. Finally, I put all
the pieces together with a diadem, I sewed the white beads on the
zigzag and voilá.
For the lock accessories, I sewed 2 tubes with lace and I sewed the
zigzag with tube and ball beads.
And, now, how I managed to put all this on my head keeping it all in
place... (I'll add at the end of the post the cosplay closet video of
this, because I showed this and it's easier to understand)
1- I pick apart 2 pieces of my hair, for the locks. I attach there 2
little rubber bands that don't slide, on the place I want the red
tubes to stay. Inside the red tubes I glued 2 bobby pins. I put those
bobby pins through the rubber bands. It should stay in place nicely,
but if you jump, it could fall off. But there's a simple solution:
putting the tube with the bobby pin too.
2- I pick apart an upper section of my hair, and I gather it all on a
tail of my hair colour. It has to be tight in order to keep
everything in place later.
3- I put a red rubber band through the hair I just tied in the last
step. I slide each side of the diadem through the 2 ends of the red
rubber band. I adjust the diadem nicely behind my ears and I secure
it with 2 strong bobby pins. If the hanging part of the ribbon moves
too much, I attach it to these bobby pins.
4- I pick all my hair and tie it near the tips. I put a red ribbon
like the one from the sleeves.
*Tip: To put the locks trough the red tubes and the red rubber band
trough the hair section, I used a hair tool that's on the photo
below. It's so useful. Without it, I would've done the red tubes
open, closing them with velcro. And velcro would've stick to my hair
;-;


TOP
Seguimos! El top lo hice bastante ancho, porque quería podérmelo
poner sin tener que poner cremalleras ni aperturas, así que le di
forma al patrón para que no pareciera un saco xD Y el cuello, lo
hice con tela blanca, cosiendo el zigzag rojo y la puntilla, antes de
montar las 2 capas del cuello. En medio, puse enetretela de pegar, no
tan gruesa como la que usé en el lazo. Por experiencias anteriores,
si la tela con la que se hace el cuello es fina y se le cosen cintas
o cosas así, se arruga mucho y/o pierde la forma fácilmente, así
que recomiendo la entretela mucho. Y le cosí las bolitas rojas al
zigzag.
El lazo amarillo lo hice con el mismo tipo de tela que el cuello,
pero amarilla (obvio). Le cosí la puntilla, después cosí la forma
del lazo. Cosí una tira a la camisa y monté el lazo ahí.
TOP
Next! I made the top with a lot of width, because I didn't want to
use any kind of zipper or whatever to put on the piece. So I made it
in a nice shape :3 so it didn't look square XD And the neck, I made
it with white fabric, sewing the red zigzag and lace, before sewing
the 2 layers together. In the middle, I ironed a piece of interlining
(thinner that the one from the ribbon). From my experience, if the
fabric you're using for the neck is thin and you're going to sew
ribbons or anything on it, it makes wrinkles and stretches and loses
the shape easily, so, I highly recommend using interlining. And I
sewed the red beads on the zigzag.
The yellow tie is from the same fabric of the neck, but it's yellow
(duhhh). I sewed the lace, then the tie shape. I sewed a strip on the
top and I put all the tie pieces there.


MANGAS
Las mangas las hice con la misma tela que el cuello. Elegí esta
forma de hacerlas un poco por comodidad, y por otro lado, estaba
haciendo malabares para utilizar la tela que me quedaba. Cada manga
es un rectángulo casi cerrado, excepto por la zona que atraviesa el
brazo, con otro rectángulo más pequeño, de tela fruncida, para la
parte superior del brazo. Para esta pieza utilicé una cinta roja
semitransparente. Ese material se deshilacha fácilmente, así que
tuve que atravesar la cinta por la manga, en lugar de coser pedacitos
de pinta sobre la manga. Como iba justa de tiempo, eran muchos
cortecitos y no soy muy fan de coser los bordes de los ojales, probé
a pegar otra pieza de tela blanca con cinta de silicona, para que
pegase las fibras de la tela y minimizase el deshilachado. Funcionó,
y eso hice. También podía haber utilizado otro tipo de cinta. Pero
yo quería usar esa.
SLEEVES
I made the sleeves with the same fabric of the neck. I chose this
shape because it was convenient. I was using white fabric leftovers,
and they were shaped weird. Each sleeve is a rectangle, almost
closed, except for the part where arms go through, with other smaller
rectangle of gathered fabric, for the upper part of the sleeve. I
picked a semi transparent red ribbon for the sleeves. That material
frays easily, so I had to put the ribbon through the sleeve's fabric,
instead of sewing many little red pieces. Because I was running out
of time, I'm not really a fan of sewing buttonholes and they were
quite a lot... I glued 2 layers of white fabric with silicon bands
(it's for sewing) in hopes that the glue would stick the fabric
enough to keep it from fraying. And it worked, so I did that. I
could've also used another red ribbon. But I wanted to use that one.


FALDA
Es bastante simple... Es un rectángulo de tela fruncido en la
cinturilla xD A la cinturilla le puse entretela gruesa como la del
lazo, para que mantuviera la forma con fuerza. La falda son algo más
de 3 veces el tamaño de la cinturilla. La puntilla de la falda es de
otro tipo, porque tan grande no había del tipo otro que estaba
usando. Y las tiras blancas decidí hacerlas con puntilla. Estas sí
están cosidas pieza a pieza, y a mano, porque se fruncía al coserlo
a máquina. La cremallera puse una externa, con bordes bonitos :3
SKIRT
The skirt's simple... It's a huge rectangle of red fabric, gathered
on the waistband xD I put stiff interlining inside the waistband, so
it could hold the shape. The skirt is above 3 times the waistband's
lenght. The lace of the skirt is different, it nedded to be longer
than the other one. And the white strips, I made it with other kind
of lace. These ones I made it in pieces, sewing them by hand, because
the sewing machine was wrinkling them. And, for the zipper, I put an
external one that has cute motifs :3


POLOLOS Y PETTI
Tanto porque pensaba bailar, como porque sé que la mayoría de los
personajes de Touhou usan pololos, usé los pololos para debajo de la
falda, y el petti, para darle más volumen :3 Pensaba que le había
sacado una foto a los pololos, pero se ve que no(?) Así que conformaos
con la del petti. Son los pololos blancos que uso para cosplay.
BLOOMERS AND PETTI
Many Touhou characters use bloomers, so it was a must. Also, I knew
they were going to be showed in the dance. I think that looks more
cute than regular security pants, and gives more volume, so I picked
that :3 I also used a petti, for more volume. I thought I took a
photo of the bloomers, but it seems like not(?) so, whatever. It's the
one I always use for cosplay.

CALCETINES Y ZAPATOS
Calcetines blancos normales y para zapatos elegí esos porque es lo
que tengo. También tengo unos escolares, negros, pero tienen un poco
de tacón y no están tan atados al pie, así que estos era mucho más
cómodos para bailar, sobretodo un baile con tanto saltito como el
que elegí.
SOCKS AND SHOES
White regular socks and I chose those shoes because that's what I
have. I also have some school shoes, but they're black (should be
brown), have heels and aren't tied like these, so it's not very
comfortable for dancing a song with lots of jumps.

VARA DE MIKO
Y, para terminar, la vara de miko. Es uno de los palos que me sobró
de los que compré para hacer una de las varas de Ranko.
Anteriormente, hice este tipo de cuelgues con papel, y resulta que se
rompe fácil, sobretodo si lo coge otra persona y no tiene mucho
cuidado. Así que decidí hacerlo con fieltro blanco.
MIKO'S WAND
And, last of all, miko's wand. It's one of the sticks I got left from
one of Ranko's wands. I already made something similar, but I did it
with paper, and, you know what? It can break very easy, even more if
someone uses your prop without care. So I made it with white felt
this time.

Y, esto es todo! Gracias por leer esto! Os voy a dejar aquí abajo el
vídeo del cosplay closet (cuando esté disponible) y el del baile
que hice con este cosplay. También algunas de las fotos que suba por
ahí :3
En fin, espero que os haya gustado. Hasta la próxima!!
And that's all!! Thanks for reading! I'll leave below the cosplay
closet video of this costume (when it is available) and the dance I
made with this cosplay. I'll also add some of the photos I upload of
it :3
Well, I hope you liked it. See ya~!!!


