Cosplay blog!!

Hell-Oh~! This is Shion-S3esther! On this blog you can find my cosplays, dances, drawings, pictures, hobbies and thoughts xD
Hell-Oh~! Yo soy Shion-S3esther! En este blog encontraréis mis cosplays, bailes, dibujos, fotos, aficiones y rayadas mías xD
Hell-Oh~! Shion-S3estherです
!このブログでは、私のコスプレ、踊ってみた、ドローイング、写真、趣味や思考を見つけることができます^^ よろしくお願いします!

Mostrando entradas con la etiqueta sewing-cosiendo. Mostrar todas las entradas

martes, 17 de abril de 2018

COSPLAY: Minase Iori ❀ Variety Animal ver. (The iDOLM@STER) ❀Pascua❀Easter❀

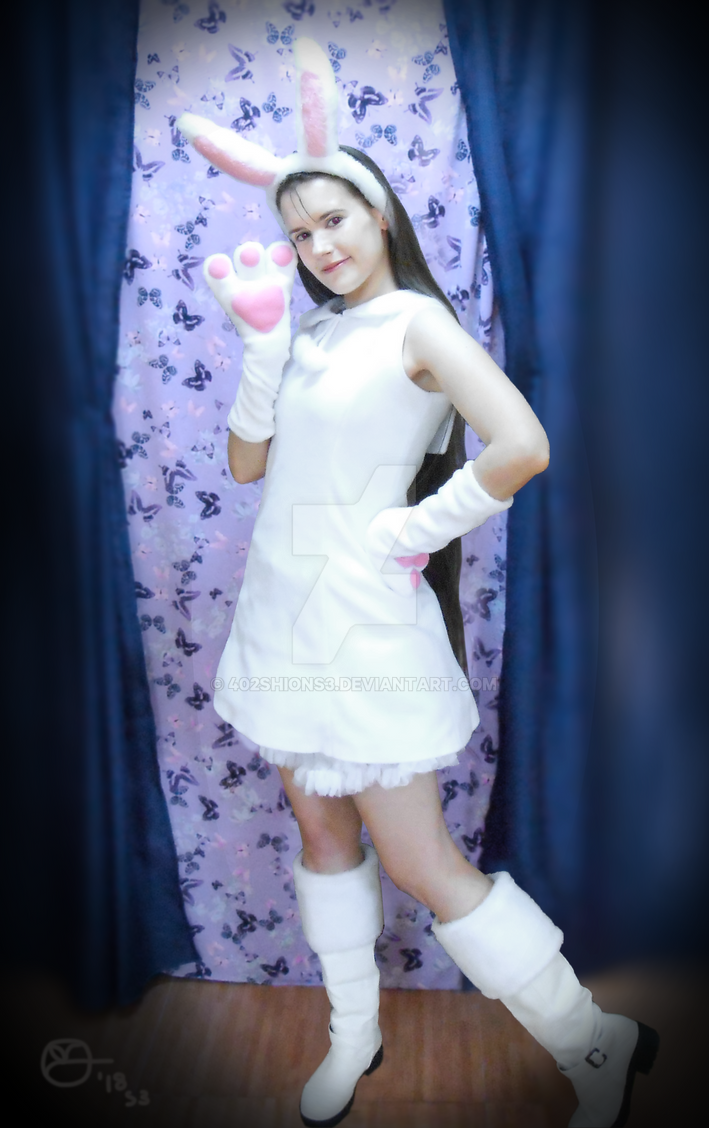
Hell-Oh!! Tras mucho batallar, aquí está este cosplay de Iori El Variety Animal varía según cada chica. Cada una es un animal, y a Iori le tocaba el conejo, obviamente por Usa-chan :3
Hell-Oh!! Here’s my new Iori cosplay, after lots of struggles ;-; The Variety Animal version is different for each girl. Each one is a different animal, and Iorin was the rabbit, of course because of Usa-chan :3

*Algunas cosas (como pulsera de pie, cascabel y una diadema) son accesorios extra que no forman parte del cosplay originalmente, así que no los he hecho.
*Some of the stuff (ankle bracelet, bell and a headband) aren't part of the original outfit, so I didn't make them.

Lo primero de todo, decir que quería tener este cosplay (y el baile) ya para el primer lunes de abril, PERO necesité más tela y después se estropeó la máquina, que menudo susto, en serio ;_;
Por eso he puesto lo de pascua en el título, porque, efectivamente, se suponía que era para pascua, pero al final lo he sacado un poco tarde -_-
First of all, I want to say that I wanted to have this cosplay (and also the dance) done by the first monday of April, BUT many things happened, and I couldn’t made it in time. (Such as needing more fabric or my sewing machine attempting to break AND scaring me as hell) ;-;
That’s why I wrote “Easter” on the title. Because it was supposed to be made on that time, but I couldn’t -_-


Dejando eso de lado, hace MUCHO que quería hacer este traje. Es sencillo y gracioso, y tenía sobras de telas para hacerlo (o eso pensaba)
Y ahora, debo /!\ ADVERTIR /!\ de una cosa para que nadie venga a pedirme cuentas: no suelo hacer esto, pero, por esta vez, he modificado ligeramente el diseño del traje. No suele gustarme hacer eso, pero este es un diseño algo antiguo, y creo que a día de hoy hubieran hecho un diseño más similar a los cambios que le he introducido. Ya indicaré en cada apartado qué he modificado, pero, básicamente, cosas en el calzado y los guantes.
Leaving that aside, I wanted to make this cosplay since a long TIME ago. It’s easy and fun, and (I thought) I had enough fabric from leftovers.
And now, I must /!\ WARN /!\ you about something, so no one makes a fuss of it: I don’t use to do this, but, for this time, I modified parts of the costume’s design. I don’t usually like doing this, but this design is old, and I think that if this design was done nowadays, it would include the changes I made. I’ll speak about those changes in its chapter, but, basically, boots and gloves.


En fin, lo de siempre, y sobretodo esta vez, que he hecho cambios en el diseño del traje: Así es como lo he hecho yo, pero tú puedes hacerlo (si es que quieres hacerlo) como te de la gana. Que hay que decirlo tó :)
So, as always, and even more this time, that I included changes on the costume: This is how I made it. You can do it (if you want to do it) as you want. I shouldn't need to say this, but somehow, some people need to be reminded of this :)

He usado: mi pelo y mis ojos (castaños), tela (polar blanca y rosa, peludita blanca y rosa, blanca normal), una diadema, relleno de peluche, alambre, cremallera blanca, un botón, hilo, unos guantes blancos largos, cancan, botas blancas.
I used: my hair and eyes (brown), fabric (white&pink fleece&fluffy, and regular white one), a headband, plush stuffing, wire, white zipper, a button, thread, a pair of long white gloves, petticoat, white boots.


OREJAS
Para esta parte, usé pedazos de tela peludita blanca y rosa. Rellené las orejas con relleno de peluche y forré la diadema. Le puse alambre enroscado por dentro para darle más estabilidad. Al final, tuve que añadirle un elástico, porque las orejas pesan un poco y se me caen al moverme, y así, solucionado.
EARS
For this part, I used pieces of fluffy white and pink fabric. I filled the ears with plush stuffing and I covered the headband with it. I also put some wire to make the ears sturdier. At the end, I had to add some elastic, because the ears are a bit heavy and they tended to fall, otherwise.


GUANTES
Esta es una de las partes que he modificado un poco. Originalmente eran unos guantes ajustados a los dedos. Con. Uñas. Por. Fuera.
Sinceramente, me gusta este traje, pero ese detalle me daba un poco de repelús, así que lo hice como las típicas manoplas de gato, pero de conejo. Pasa de ser creepy a ser mono. Se llama magia.
En fin. Usé la tela polar en blanco y rosa, con la forma de patita, rellenando las almohadillas y el propio guante con el relleno para peluche, y puse por dentro los guantes blancos.
GLOVES
This is one of the parts I modified a little. Originally, this gloves looked like fitted fluffy gloves. With. Nails. Over. It.
I like the costume, but that particular detail freaked me out, so I changed it from creepy to cute. Pure magic.
Whatever. I used white and pink fleece, with the shape of a paw, and I filled the glove and the pads with plushie stuffing. And I put the regular white gloves inside the paws.


BOTAS
Esto es lo otro que he modificado. Era similar a los guantes, pero en los pies. Y, ok no. Así que, simplemente usé mis botas blancas todoterreno, con el borde peludito que hice para el Cute&GirlySnow Strawberry de Iori.
BOOTS
This is the other part I changed. This one was like the gloves but on the feet. Ok no. So, I simply used my all-time white boots, with the white and fluffy border that I made for Iori’s Cute&Girly SnowStrawberry.


VESTIDO
Para el vestido usé la tela blanca polar como base, y la tela blanca normal para la doble capa del cuello y para doblar bordes. Y un poco de tela peludita para los pompones. Esta vez le puse la cremallera en un lado porque como estaba el cuello de esa manera, no podía abrir el vestido por otro lado. Y, bueno, la verdad es que no tiene mucha complicación este traje (sólo si tu máquina de coser decide ponerse guerrera)
Lo único más trabajoso fue hacer los patrones y probarlos primero en otra tela, tras lo cual hice unos pequeños cambios y luego ya corté la tela buena, que es lo que hice para el vídeo de la cover de Shiny Smile.
DRESS
For the dress I used the white fleece fabric for the body, the regular white fabric for the 2nd layer of the sailor collar, and a bit of fluffy fabric for the pompoms. This time I put the zipper on the side. Because of the collar, it couldn’t be in other place.
This dress is easy, the only thing was doing the patterns and testing them first on other fabric to see if the worked fine. I made some changes and then I moved onto the fleece fabric. This is what I showed you in the video for Shiny Smile’s cover.


COLA
Con la tela peludita, cosí dos piezas con forma de media circunferencia y reuní los bordes para cerrarlo como bolita. Le puse relleno de peluche y un botón para engancharlo al vestido.
TAIL
I sewed together 2 half circle pieces of fluffy fabric, then I gathered the edges to make a ball. Filled it with plushie stuffing and I put a button to attach it to the dress.


CANCAN
No es del todo necesario, de hecho en el diseño original, el vestido no tiene volumen, pero pensé que puestos a hacer cambios, por qué no.
PETTICOAT
This isn’t really neccesary. In fact, the original design lacks volume on the skirt. But I decided to add it, because I was already changing it, so whatever.


Eso es todo. Como sabréis, grabé un baile con este cosplay, os lo dejaré más abajo del texto. También añadiré fotos cuando sea xD Y quiero decir que mi gata, Midna, se ponía feliz al verme vestida con este cosplay. Tal vez porque iba de blanco como ella, no sé xD
En fin, hasta la próxima!!!
Well, that’s all. I recorded a dance with this cosplay, it’s below this. I’ll also add pics of the cosplay someday xD And I want to say that my cat, Midna, was happy to see me wearing this costume for some reason xD (maybe being white, like her??) xDD
Well, see ya~!!!


http://fav.me/dc8zxc3
This one on deviantArt. To see it without watermark, click on: CureWorldCosplay

..

martes, 3 de abril de 2018

SONG- Shiny Smile ♫ The Idolm@ster

Hell-Oh!! Pues nada! Esta vez he grabado una canción, como bien dice el título, Shiny Smile de The iDOLM@STER
Hell-Oh!! So, this time I recorded a song! As the title reads, it’s Shiny Smile from The iDOLM@STER


Esta canción me gusta mucho y siempre quise grabar la cover. Lo intenté varias veces antes del hiatus, pero nunca pude por culpa del ordenador.
I love this song and I really wanted to record a cover of it. I tried recording it many times before the hiatus, but my laptop wouldn’t let me do it :(


Así que lo he grabado ahora, que ya tengo ordenador nuevo. Pero como hacía tanto que no me grababa, me ha costado un poco xD A todo esto, que es la primera cover desde que retomé las actividades xD No pensaba que fuera a ser justo esta, pero está bien :3
So, I recorded it now, because I have a new computer. But, since it’s been a long time without recording, it’s been quite a struggle x_D Anyway, it’s the first song cover since the comeback xD I wasn’t planning this song to be the first one, but it’s ok xD


Bueno, pues de la canción puedo decir poco más, así que hablaré del vídeo. He grabado cómo empiezo todos mis cosplays (más o menos).
Primero hago los patrones, luego los pruebo en tela de prueba, me lo pruebo a ver, y si hay cambios, modifico los patrones y esos ya los paso a la tela buena. Y, a partir de ahí, ya es coser. El vídeo es de la parte que ya paso los patrones a la tela buena.
So, I don’t have anything else to say about the song, so I’ll talk about the video. I recorded how I usually start off all my cosplays (more or less).

First of all I make the patterns, then I transfer them to test-fabric, try them on, and then I adjust any changes on the pattern. Finally, I transfer the patterns on the actual fabric and the sewing process starts.


El cosplay que se ve, es el nuevo en el que estoy trabajando ahora mismo. Espero tenerlo acabado pronto para que lo veáis :3 ¿Adivináis cuál es?
The cosplay from the video is the new one I’m working on. I hope I can finish it soon, so I can show it to you :3 Can you guess which one it is?


Y, bueno, pues ya está. Pronto podréis ver un nuevo cosplay, si detective pikachu me deja ser productiva xDDDD En fin, aquí os dejo el vídeo, espero que os guste!
Hasta la próxima!!
/!\ Pues, por alguna razón que desconozco, el audio no se escucha correctamente desde móviles, así que escuchadlo desde PC, si podéis, antes de comentar o dejar feedback /!\
And that’s all. Soon, you’ll see a new cosplay, if detective pikachu let’s me being productive, that is xDDDD Welp. Anyway, here’s the video, I hope you like it ^^

See ya~!!
/!\ So, apparently, the audio can't be heard properly on mobile phones, so please, watch it on PC before leaving any feedback :/ /!\


miércoles, 21 de marzo de 2018

COSPLAY: Kagami Hiiragi from Lucky☆Star - 柊 かがみ

Hell-Oh!! Hoy traigo un cosplay!!!!!!! Bieeeeeen xD Es Kagami Hiiragi de Lucky Star.
Hell-Oh!! Today’s cosplay time!!!!!!!! Yay~ lol xD The cosplay is Kagami Hiiragi from Lucky Star.


Este es otro de esa larga lista de cosplays que quiero hacer desde hace mucho tiempo, desde antes de 2013. Pero la peluca y los materiales los tengo desde bien temprano en 2014, así que… :_D
De hecho ni siquiera pensaba que este iba a ser el próximo que iba a hacer, pero con los bailes de Umaru, para vestirme parecido, no tenía ninguna falda rojiza (sin estampado) y de repente me acordé que tenía este cosplay por hacer, con la tela y todo, así que, eso xD
This is another one of those cosplays from my long long wishlist. I’ve been wanting to do it since before 2013, and I had the wig and materials since 2014, so… :_D
In fact, I wasn’t planning on doing this one now, but I needed a reddish skirt for the Umaru dances, and I didn’t had one, but I remembered that I had fabric for this cosplay… and here it is xD


Hablando del tema del color de la falda y del pañuelo... (que voy a hablar de eso ahora, o alargaré demasiado el apartado correspondiente) Sé que es un tema complicado, pero hay que nombrarlo. Hay mucha gente daltónica en el mundo, y parece que la mayoría son los vendedores de uniformes de Lucky Star. (Sin querer burlarme de los daltónicos de verdad, plz) Sé que la falda PARECE roja, pero NO lo es, al menos no la clase de rojo que todo el mundo piensa. Es un rojo de carmin claro, o en su defecto un rojo o rosa fresa (que aclararé, son varios tonos de luminosidad más claro o menor saturación del rojo carmín, porque hay gente que le llama rosa fresa al puto fucsia plz) LO SIENTO, NO LO SIENTO, ME SALE MI VENA DE PINTORA CUANDO SE TRATA DE COLORES Y QUE LA GENTE NO SE FIE ._. En fin, que he encontrado en san google la imagen perfecta de por qué el uniforme NO es ni rojo ni muy oscuro. Y que entiendo que si os resulta más barato, paseis de ser tiquismikis con los colores y os lo compréis hecho, al contrario que yo, pero es que el tema de los colores, en concreto, es muy importante para mi a la hora de hacer cosplay.
Vamos, es que solo hay que ver el pañuelito rosa. Si la falda fuese roja pura, quedaría como una patada en el culo. VALE. Ya terminé de quejarme.
Now, talking about the skirt and handkerchief’s colour… (I’m going to talk about it now, because this is going to be long) I know this is a complex issue, but I NEED to talk about it. There’s a lot of colour blind people over there, and it looks like all of them are this Lucky Star uniform sellers. (Not pretending to joke about real colour blind, ok?) I know the skirt LOOKS like red, but it is NOT, at least not the kind of red everyone thinks first. It’s a light carmine or a strawberry pink/red (lighter shades of carmine and less saturation than carmine. Strawberry pink is NOT fuchsia, like many people seems to believe. Yeah, believe) SORRY, NOT SORRY, BUT WHEN IT COMES TO COLOURS, MY ARTIST BLOOD BOILS BC PPL WITHOUT TRAINED EYES FOR COLOUR DON’T TRUST THE ONES THAT ARE TRAINED ._. So, I found at st. google an image that depicts perfectly why the skirt isn’t red. And I understand that bc it’s cheaper you’d rather buy it unlike me, but colours are awfully important for me, and that’s something I can’t play around with while doing cosplay.
You just need to look at the pink handkerchief. If the skirt were pure red, the pink handkerchief would look awful. OK. Enough complaining.


Nótese cómo han editado el color del uniforme en la 1ª imagen para que encajase con el traje de la derecha
Notice how they edited the color on the 1st image just to match the cosplay on the right.

Y tras ese apunte… Obviamente se puede hacer de muchas maneras, pero yo lo he hecho de la siguiente manera, y he NECESITADO: Camisa blanca grande, tela rosa fresa, tela rosa y gris, calcetines blancos, zapatos escolares, peluca, lentillas, cinta blanca y diversos útiles de costura.
After that, you can obviously do it in many ways, but the way I did it, I NEEDED: White huge shirt, strawberry pink fabric, pink and gray fabric, white socks, school shoes, wig, colour contact lenses, white ribbon and sewing stuff.


CAMISA. Lo primero, decir que compré tela blanca para esta pieza, pero acabé usándola para otro cosplay, y de todos modos, no importa, porque no tenía muy claro cómo hacerlo, porque hay uniformes de estos en los que se nota por dónde está la apertura, pero en este no. Y ya sé que se supone que es ancho, pero no TAN ancho como para llevar una mesa camilla. Así que, cuando tuve que comprar la camisa para Umaru, iba en pack de 2 y pensé que me serviría perfecto, incluso las mangas son más largas, las aproveché para hacerle volumen con los puños. Le añadí el cuello de marinero, acorté la camisa, y le puse el pañuelo. El pañuelo es algo más oscuro de lo que me gustaría, pero no encontré uno más claro que no fuera demasiado claro. Aunque al final, gracias al brillo de la tela queda bien.
Esta clase de tela (elástica) es un horror, y la máquina de coser que uso es algo vieja, así que me desesperé bastante...
Como véis, no explico mucho sobre el cuello de marinero, pero es que hay ya demasiados tutoriales para esto, y en vídeo, que es más útil que por escrito.
SHIRT. First of all, I need to say that I bought white fabric for this, but I ended up using it for other cosplay. But it’s ok, because when I bought the huge shirt for Umaru, they came by 2 unit. pack, so I thought it would be good for this cosplay. The sleeves are very long, so I used that to puff the cuffs xDDDD (ok). I added the sailor collar with the white ribbons(?) and the handkerchief. The handkerchief is darker than what I’d like it to be, but the shine of the fabric makes it looks better.
The fabric from the shirt was horrible to work with. My sewing machine is quite old so I ended up sick of it.

As you see, I’m not explaining the sailor collar with detail because the internet is plenty on this, and better explained than just text.


FALDA. Vale, las faldas plisadas no son muy complicadas, pero es aburrido y a veces, complicado de acabar de encajarlo, así que para esta vez, traté de usar un método diferente. Corté un rectángulo de cartulina, del tamaño de cada pliegue, dibujé los rectángulos necesarios en la tela, por el lado interno, y después lo planché usando la pieza de cartulina, y esto lo hizo mucho más rápido y sencillo. Le pasé un zigzagueo por el lado de la cinturilla, para sostener los pliegues, después de haber unido las 3 piezas con pliegues, y haber puesto la cremallera. Y ahora viene el adelanto de la ciencia. Encontré en la tienda un rollo con cinta muy delicada, que pega por los dos lados. Esto es como la entretela que suelo usar, pero pega por ambas caras, es más fino y viene ya cortado en una forma regular. Así que usé esto para ayudarme a hacer y sostener el dobladillo y la cinturilla de la falda, y es genial ♥ Se puede dejar así o hacerle una costura invisible. Yo quería hacerle la costura invisible, pero esta tela es tan tiesa que se le notaba demasiado y tuve que quitársela. Para acabar, le puse un botón a la cinturilla. Hice hasta ahí para los bailes de Umaru, y después le añadí las cintas blancas.
SKIRT. Ok, pleated skirts are boring to do, even if they aren’t difficult. So I tried to do if in a different way than other times. I made a cardboard rectangle with the measurements of each pleat. I traced the pleats and I ironed the fabric with the help of the cardboard, and that was so fast and easy. Then I sewed a zigzag over the pleats to keep them in place. Now comes magic. I bought a thin tape with glue on both sides, that activates when ironing it. It’s like interlining, but thinner, with glue on both sides and already cut. I used this as help to do and keep fabric in place for the edges and the waistband. You can leave it at that way, or finish it with an invisible stitch. I wanted to do the invisible stitch, but the fabric's so stiff that it didn't look nice, so I had to take the stitch out. And then, I put a button. I made until this for the Umaru dances, and then I added the white ribbons(?)


CALCETINES Y ZAPATOS. Usé unos calcetines que tienen puntilla en el borde, doblándolo hacia adentro para que no se vea x_D Y para los zapatos, acabé usando unas deportivas carmín oscuro, por tema de comodidad en el baile, pero usaré para fotos los zapatos escolares negros que tengo.
SOCKS AND SHOES. I already had a pair of socks that have lace, so I hid it inside the socks xD And for the shoes, I wore some carmine sneakers for the dance (more comfortable), but for the photos I think I'll wear my black school shoes.


PELUCA, LAZOS Y LENTILLAS. Pues nada, a la peluca le estilicé el flequillo, uso las lentillas azules que tengo y los lazos... Son de un color raro. Y digo esto porque depende de dónde mires, los tiene grises, morados o ciruela grisáceo. Así que opté por teñir entre morado y ciruela una cinta morada, e hice los lazos con eso.
WIG, RIBBONS AND CONTACT LENSES. Well, so I styled the bangs, I use the blue contact lenses I have and the ribbons... are weird. And I say this because the colour is different at each reference picture you look at: gray, purple or plum. So I dyed purple-plum-ish some purple ribbon, and I made the ribbons with that.


Y bueno, pues ya está! No sé si haré más cosplays de Kagami, aunque debería, para sacarle partido a la peluca. En fin, en cualquier caso, espero tener fotos pronto. De momento, os dejo aquí el baile que hice con este cosplay ^^ Espero que os guste!!!
Hasta la próxima!
And that’s all! I don’t know if I’ll make more Kagami costumes, though I should, just to get profit of the wig. Anyway, I hope I can get the photoshoot soon. By now, I'll put here the dance cover I made with this cosplay ^^ And I hope you like it!!!
See ya~!!


(Y en este Medley de bailes de anime, hay un pedacito del Motteke! Sailor Fuku, bailado en 2020, 2 años después de la cover que hice, por si os apetece comparar la mejora, aunque no llevo el cosplay)
(And in this Anime Dance Medley, there's a small Motteke! Dailor Fuku bit. This was danced in 2020, 2 years later to the cover above. Just in case you want to check the upgrade, even though I'm not wearing the cosplay there)


..

viernes, 29 de diciembre de 2017

COSPLAY: Snow Halation - Kousaka Honoka (Love Live)

Hell-Oh! Feliz Navidad!!!!!! No pensaba que tendría tiempo para hacer ningún cosplay de navidad este año, pero, sí!!! Es el Snow Halation de Kousaka Honoka (Love Live).
Hell-Oh! Merry X’mas!!!!! I was embracing the idea of not having a winter/christmas cosplay this year because I’m busy, but I did one xD !!! It’s Kousaka Honoka’s Snow Halation (Love Live).


Hablando de cosplays de navidades o de invierno, de hecho tengo material para otro traje y un par más en la wishlist, pero estoy ocupada, así que pensé que este año no podría ser, pero… me di cuenta de que tenía casi todo el material para este, me emocioné, y… lo hice en una semana :_D (dejando de lado otras cosas que tenía que hacer :_D ajajajaa lloro)
Talking about those cosplays, in fact I had material for one and others in the wishlist, but I’m busy so I thought I wouldn’t be able to make one this year, but… I realised that I had almost all the materials for this one. I got excited and I made it. In a week. Leaving aside the other things I had to do. cries in spanish

Estuve decidiendome entre Honoka y mis dos favoritas de la temporada (que Honoka no era), pero, como ya sabréis, estuve en un grupal (muy fugazmente) y Honoka era el único personaje restante y pues lo acepté. Qué pasa? que de este tengo peluca, es más económico, y ya tengo cosplays hechos de ella, y quitando caprichos puntuales, soy muy de seguir con el mismo personaje siempre. Además, tras probar su cosplay, le cogí cariño. No es el tipo de caracter en el que me suelo fijar, porque son muy extrovertidos (cosa que yo no) y muy alegres siempre (yo soy más grumpy xD), pero definitivamente cuando se me quita la timidez soy así también xD Así que buenop. Y nunca había usado peluca pelinaranja, y me gusta xD
I had to decide between Honoka and my 2 faves from the season (wich Honoka wasn't), but, as you may know, I've been in a LL groupal (fleetingly) and Honoka was the only character left, and I accepted bc I wanted to join and have fun. And, now? I already have the wig, it's inexpensive compared to the other ones. I already have some cosplays of her and, excluding any outfit I like better on other character, I like to stick on the same character. Besides, after cosplaying her, I got attached to her, and I also like how I look with orange hair xD She's not the kind of character I use to look at or get attached to, because I'm more shy and grumpy than them, but I'm also like that (not at first sight, though), too, so it's ok xD

En fin, para este cosplay yo he usado: peluca y lentillas para Honoka, telas blancas (peluda, polar, estilo gasa y una normal), cosas blancas (guantes, botas, rosa, camisa, puntilla, plumas), cinturón marrón, abalorios varios, bies rosa pastel, cinta rosa oscuro, botones dorados, varios botones de clip y una corbata rosa (intermedio entre los otros dos). Tinte azul.
Well, for this cosplay I needed: Honoka’s wig&lenses, white fabrics (polar, fluffy, chiffon-like and a basic one), more white stuff (boots, shirt, gloves, rose, feathers, lace), brown belt, golden buttons, more buttons, pink stuff (pastel bias, medium necktie, dark ribbon), blue dye, random beads.


CAMISA: Pues tenía por aquí una camisa que no uso ya, porque tiene varias cosas de estar usada que para vestir no me gusta, pero para el cosplay iba bien, así que le corté las mangas, le arreglé el ancho y le añadí unos botones.
Le cosí en el cuello las crucecitas rosas con una cinta semitransparente, ya que pensé que quedaría más bonito.
Teñí de azul la puntilla, porque puntillas bonitas que no sean blancas, negras o beige es imposible, es más fácil teñirlas.
También teñí retales de tela como la de la falda, para los piquitos de los hombros. Tenía duda de si coserlo en la camisa o en el chaleco, pero al final lo puse en la camisa, porque me da más miedo que se manche el chaleco que la camisa (en el remoto caso que el tinte manche, que no debería ser el caso pero me aseguro). Bueno, pues cosí los picos, le puse una entretela para que se quedasen tiesos y le cosí abalorios :3 Y ya.
SHIRT: I had a shirt around here that I don’t think it looked good to wear, but it was ok for cosplay (so glad about my diogenes), so I cut out the sleeves, fixed the armhole and added some buttons.

I sewed the dark pink ribbon on the neck. I used a semitransparent one bc I thought it would look more fancy.

I dyed the lace blue, because it’s impossible (at least here) to find beautiful lace in other colous than white, black or beige. And I sewed it on the shirt.

I also dyed some fabric from the skirt leftovers, for the “spikes” on the shoulders. I doubted sewing it on the shirt or the vest, but I sewed it on the shirt because if the shirt gets blue stains I wouldn’t mind, but I don’t want the vest to get stained :_D (not that the dye’s going to stain stuff, but better be careful). Well, the I sewed the spikes, I added backing and I sewed on the beads :3 That’s all.


CHALECO: Son retales de la tela que me sobró del Snowflake Lilliput xD Más una tela normal que usé de forro (la típica tela de forro da sensación demasiado fría para un cosplay de invierno :/ Además, esta ya la tenía). Hice los patrones, corté las telas, lo cosí todo, añadí la tela peludita en los bordes, puse el cuello y los botones. Y casi me olvidé de los bordes en los brazos, que añadí al final xD
VEST: The polar fabric I used is from Snowflake Lilliput’s leftovers xD (again, diogenes ♥) and a random fabric I had around here for the lining. I made the patterns, cut the fabric, sewed it all, added the fluffy fabric to the edges, added the neck and the buttons. Then I almost forgot the fluffy fabric on the armholes and I added it later xD


FALDA: Corté dos capas de falda circular, las uní y a la de abajo le puse una cremallera. Para la 3ª capa, arriba, hice el patrón según es el diseño, pero acabé modificándolo porque quedaba raro tal cual.
Les cosí el bies y la puntilla teñida a las capas correspondientes.
Para la cinturilla, la 3ª capa solo se abre delante, pero no iba a poner la apertura de las dos capas largas de la falda en el centro, delante ._. Así que cosí la cinturilla a esta 3ª capa, con un botón de cierre en el centro, pero de las dos capas inferiores solo cosí 3/4s de la falda (abierto del centro a la cremallera) para poder abrir la falda y ponérmela, con varios botones de clip a la cinturilla para que se mantuviera en el sitio.
SKIRT: I cut 2 circle skirt pieces, I joined them and I put a zipper on the down one. For the upper piece, I made a pattern, but I ended fixing it bc it looked weird.

I sewed the bias and the dyed lace.

So, this 3rd skirt piece opens up in the middle, and the others on one side (not going to open the skirt on the front, thanks), so I sewed the waistband to this 3rd layer, with an open-close button there on the middle. I only sewed ¾ parts from the 2 other layers to the waistband, so I could open up the skirt from the middle to the zipper. I put some buttons to join this ¼ to the waistband.


GUANTES: Primero estuve buscando el 2º guante que me sobró del Snowflake, pero no lo encontré, y de todos modos me venía enorme, así que me compré otro par, que era elástico, así que mejor para mi. xD Le cosí el borde peludito y ya.
*Más tarde me di cuenta de que los guantes llevaban unos pomponcitos, porque en la carta o no los lleva o no se le ven :/ Los añadí, pero esta foto se queda aquí xD
GLOVES: First I wanted to find the 2nd glove I didn’t use from the Snowflake, but I couldn’ find it. So I bought a new pair, which wasn’t that bad, because this new gloves are elastic and fit better that the other pair. I sewed the fluffy fabric on the edges and that’s all.
*Later,  I realized that the gloves have 2 tiny pompoms, because in the card they're either not there or hidden :/ So I added them, but I don't change the photo xD


BOTAS: Bueno, pues las botas blancas de siempre, esta vez sin forro. Y estoy reutilizando la pieza peludita del Snow Strawberry de Iori xD Soy consciente de que la pieza en este cosplay es más fina, pero tampoco le estoy poniendo las piezas doradas a la bota, y por lo general la gente ni siquiera usa botas para este cosplay, así que me da IGUAL xD AHORRO!
BOOTS: I’m using the same white boots I use in many cosplays, not covering it. And I’m using the furry piece from Iori’s Snow Strawberrycosplay. I realize that this fluffy part should be thinner, but I’m already not putting the golden parts on the boots, and for this cosplay many people doesn’t even wear boots, so who cares xD SAVINGS


CINTURÓN: No foto. Es un cinturón que ya tenía por aquí xD
BELT: Without pic. It’s a belt I had around here xD

CORBATA: Iba a comprar una tela para esto, pero encontré una corbata de un color aceptable, la corté, remodelé e hice esta corbata y me sobró para el lazo para la cabeza. Le cosí de la misma cinta que la del cuello de la camisa y au.
NECKTIE: I was going to buy a fabric for this, but I found a colour-fitting necktie and I decided to use that. I cut it appart, fixed the shape and I made this necktie and the head’s ribbon out of it. I sewed the pink ribbon and it’s complete.


ACCESORIO CABEZA: Tenía una rosa sobrante de un ramillete que compré para el Rosenburg Engel de Ranko, así que usé esa :3 También tenía plumas sobrantes de ese mismo cosplay, y el lazo de los restos de la corbata del punto anterior. Teñí las dos plumas peluditas y lo junté todo. Le añadí algunos detallitos de mi cosecha como la cadenita de perlas, las florecitas de abalorio o los reflejos de pintura nacarada ♥
HEAD ACCESSORY: I had one white rose left from Ranko’s Rosenburg Engel, so I used it :3 I also had white feathers left from that cosplay, and the ribbon from the necktie scraps. I dyed some of the feathers and joined all the pieces together. I added some details because I wanted ♥


En fin, esto es todo. La verdad, ha sido un cosplay bastante sencillo, rápido, barato y muy cómodo xD Me recuerda a algunos modelitos de hello project xD Cuando me lo probé no pude contener tararear momoiro kataomoi xD
Bueno, lo de siempre, añadiré fotos cuando pueda tener una sesión, y también el baile xD
Edit: Lo bailé junto a Angelical Ume Cosplay con cosplay de Kotori (por Bah no Mahou), os dejo abajo también este otro baile ^^ espero que os guste!
¡Hasta otra!
Well, so that’s all. This has been a really simple, fast, inexpensive and comfortable cosplay :3 It reminds me of some hello project outfits xD When I tried it on completed, I couldn’t help myself humming momoiro kataomoi xD
And, then, like always. I’ll add the pics when I get a photoshoot and also the dance xD
Edit: I also dance it with Angelical Ume Cosplay with Kotori costume (made by Bah no Mahou), I leave this video below, too ^^ I hope you like it!!

See ya~!!!!


Test photo
http://fav.me/dc72mmc
To watch this pic without watermark, please take a look here

.